
I applied for the new UK Electronic Travel Authorization (UK ETA) before my flight to London in July 2025. I’m sharing my experience, as starting in February, the UK ETA will become mandatory for Canadians who want to enter the popular European country. More specifically, it’s for those who want to take a flight to the country, like almost all entry requirements.
It was extremely simple, like each one of the many times I’ve had to obtain an electronic visa or electronic authorization.
I was going through London to use the self-transfer trick, the best one for Europe. Flytrippers helps you travel for less through our 3 types of content, namely flight deals, travel rewards, and tips/inspiration/news.
Here’s my UK travel authorization experience, including a detailed step-by-step guide for those who want to be reassured or want more help.
Let me remind you that checking country entry requirements is literally the only mandatory step to travel. Every country, every trip. Simple!
Because many countries have entry requirements. Even a popular country like the UK. Over 30 European countries will require the same thing in 2026, which is the European Travel Information and Authorization System (ETIAS).
I had to apply for the UK ETA a bit too last-minute for my liking, because my passport renewal was due, and I obviously had to do that before applying for the UK travel authorization.
Here’s how it went for my UK ETA application:
- I went to the official website to apply
- It was very easy to do (read and fill out)
- It took just a few minutes
- I received my UK ETA instantly
The first 3 points are common to all applications for e-visas (electronic visas) and ETAs (electronic travel authorizations), or almost.
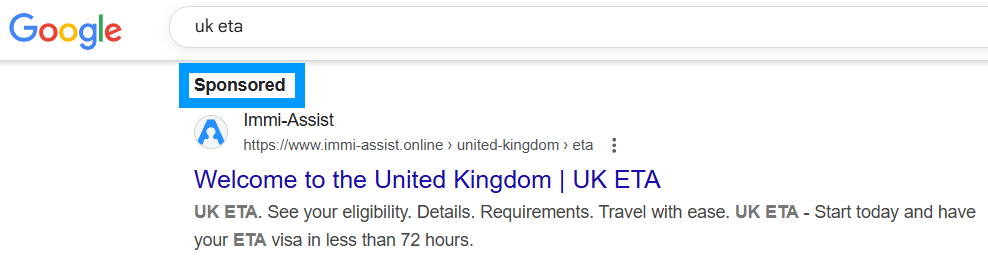
Official website: Don’t get fooled like a frankly fascinating number of people who overpay for their various visas because they click on the first Google result, which is obviously an ad for a useless service that charges you more for absolutely nothing. It’s always a good idea to read carefully, for everything in life!
Very easy: As always, it’s extremely simple to do yourself. If you can read what’s written on the screen, you’re fine. You just have to fill out each field in the form and follow each step, and you’re done. If you can’t fill this out alone, quite frankly and without any malice, I just don’t know how you can manage to get by when traveling. So it’s a good idea to learn to be a little bit resourceful.
Just a few minutes: It took me 10 minutes, but I lost a few minutes taking screenshots and notes for you (the section below). I honestly will never understand why so many people are so afraid of forms like this; it doesn’t take any time at all, and there’s nothing complicated about it. It’s normal to fear the unknown, but it’s so easy these days to make sure that anything is no longer unknown.
Instantly: This can obviously vary, but in my specific case, I received the UK ETA as soon as I finished the application. Zero wait. But if your answer to questions about criminal records or terrorism activities is different, it can certainly slow down the process. Joking aside, they officially say to allow at least 3 business days, so don’t wait too much until the last minute either.
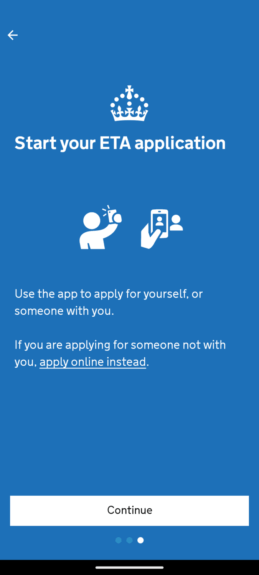
Let’s now look at how to fill out the UK ETA application, step by step, in a very detailed fashion, for those who are interested.
As indicated in our ultimate guide on the UK travel authorization, there’s an official UK ETA website.

As always, you need to go to the official website. For me, it’s pretty obvious when a website is an official government website or not, but maybe it’s a generational thing. Maybe that deserves a separate post.
Anyway, it says Gov UK in big letters; here, it’s clear.
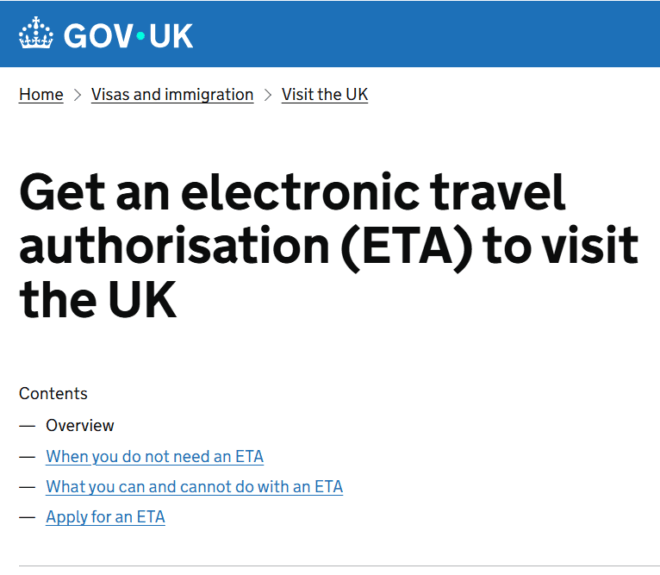
Bureaucrat-designed websites aren’t always well-made. But this one has a clearly indicated section on how to apply for the ETA, with a big green “Start now” button to begin.
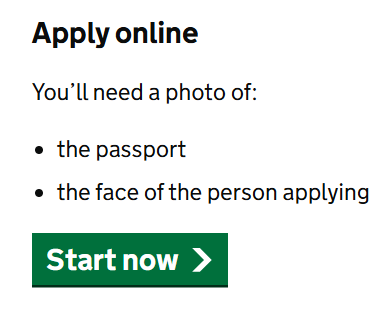
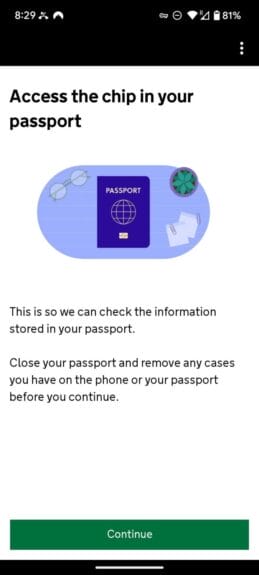
There’s also a reminder that you need a photo of the passport and the face of the person applying (you’re allowed to fill out for your loved ones who can’t fill out forms).
They strongly recommend applying on their official app, including apparently for a faster response.
It’s pretty rare to have an app for a country’s entry requirement; I think it was the 1st time I’d seen this after doing visas for several of the 75+ countries I’ve visited (since then, I did it on an app for Australia, too).
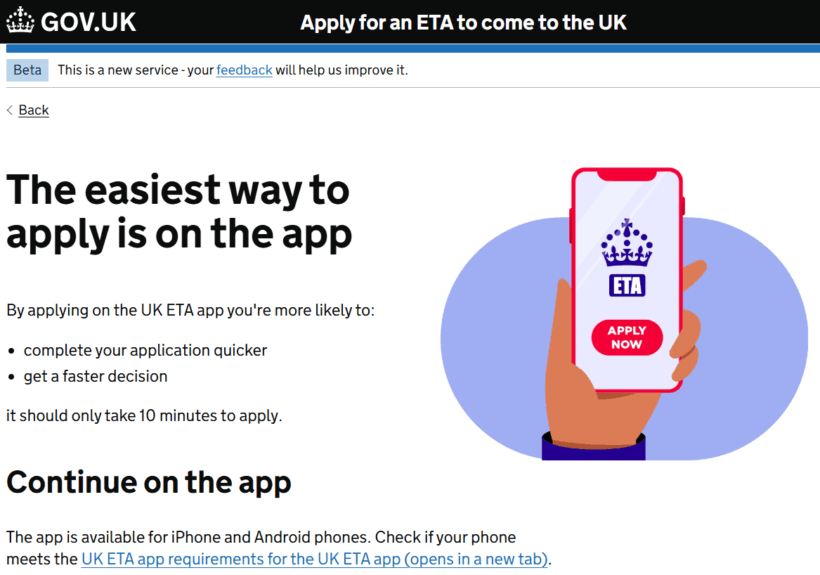
(And if you’re one of those who say “Not another app”, I don’t really understand that either. You download it, you fill out the application, and you delete the app. Done. Not more complicated than that!)
There’s a QR code or direct links for the App Store and Google Play, as well as the link if you prefer to apply on their website.
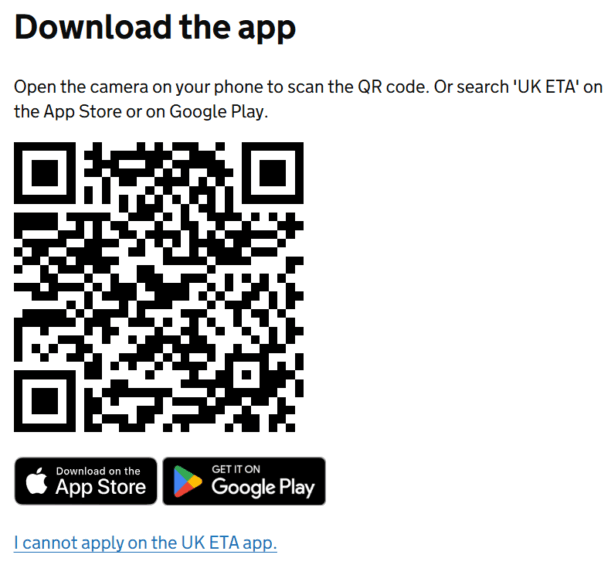
I used the app for my application.
So, unsurprisingly, you need to start by downloading the application.
Once that’s done, open the application.

When it loads, you’ll see how to fill out your application.
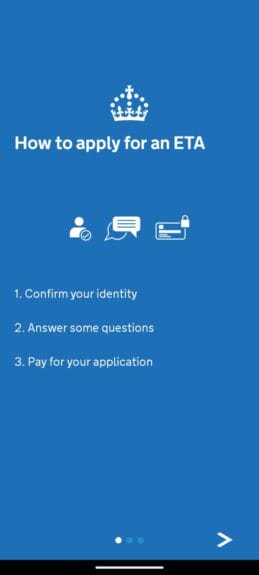
Then you click on the arrow at the bottom right to continue, and it tells you exactly what you’ll need to fill out your application.
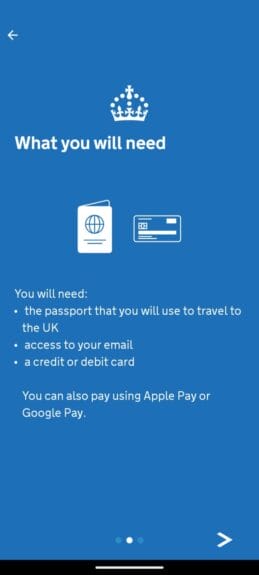
What you need:
- The passport you’ll use to travel to the UK
- Access to your emails
- A credit or debit card
- Or Apple Pay or Google Pay
I obviously don’t need to tell you how not savvy it is to pay by debit. Credit cards give you free rewards.
But the UK ETA fee is charged in foreign currency.
So paying with your regular credit card is not that much savvier unless you’re unlocking a welcome bonus (as you always should be doing) or you have a card with no foreign transaction fee (a must if you’re not maximizing by unlocking bonuses). I’ll come back to this at the payment step.
Once you have your passport in hand, click “continue” to start your application.
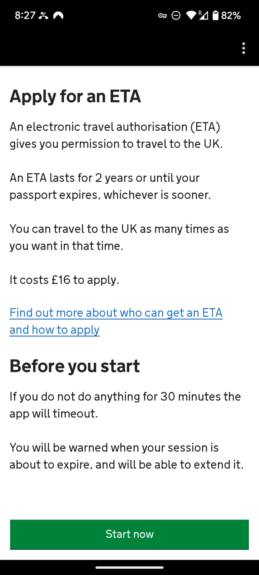
Actually, to start the application, you need to click “start now” on the next page.
Here they also remind you of the facts one last time before starting;
- The ETA gives you permission to travel to the UK
- Valid for 2 years or until your passport expires
- Costs 16 GBP (in theory)
- If you do nothing for 30 minutes, your session will expire
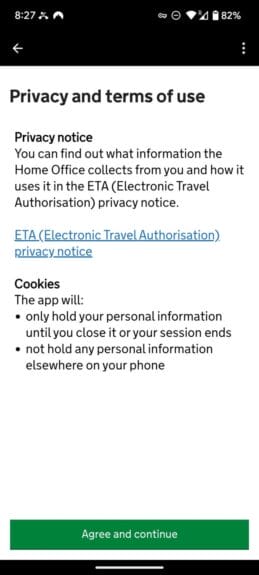
And obviously, you must accept the terms of use before being able to start filling out your application.
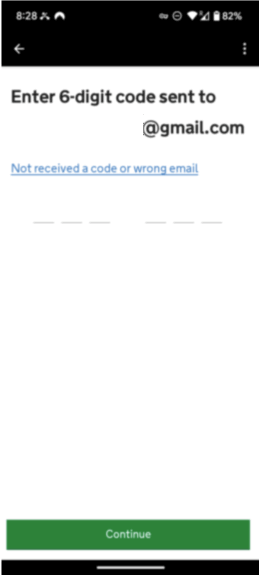
Once you’ve accepted the terms, the first thing you’ll be asked is to enter the email address where you want to receive the decision for your ETA.
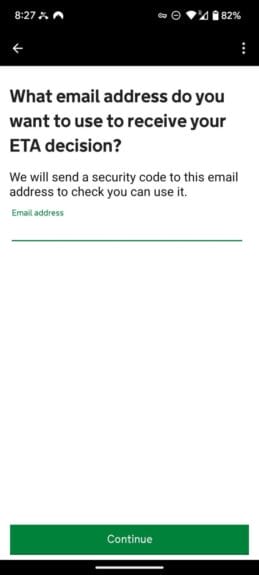
When you click “continue”, it will send a 6-digit MFA (multi-factor authentication) code to your email that you must enter before being able to continue.
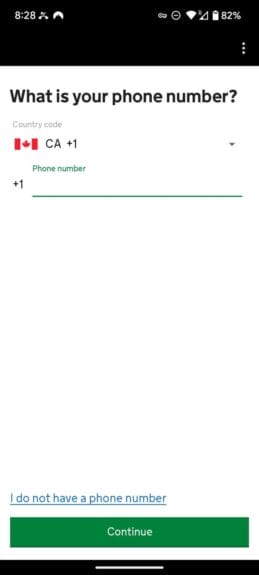
Then you need to add your phone number. You won’t need it, don’t worry.
You’ll be asked if your passport has a biometric chip, and you must answer yes or no (Canadian passports have had one for over 12 years now).

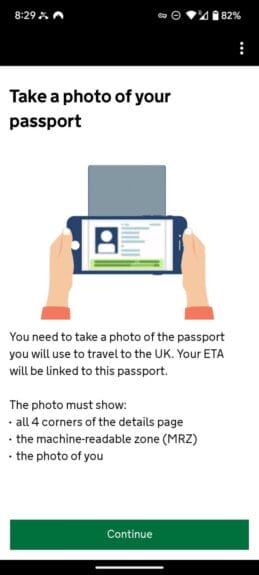
After, you need to take a photo of your passport.
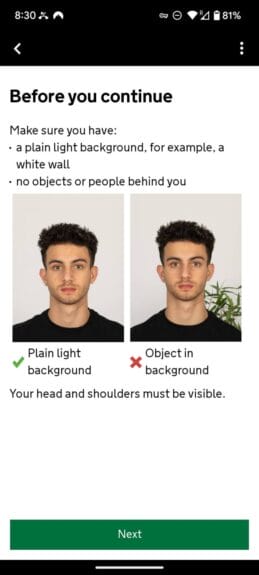
They also remind you that your photo must show:
- The 4 corners of the page
- The machine-readable zone (MRZ)
- Your photo
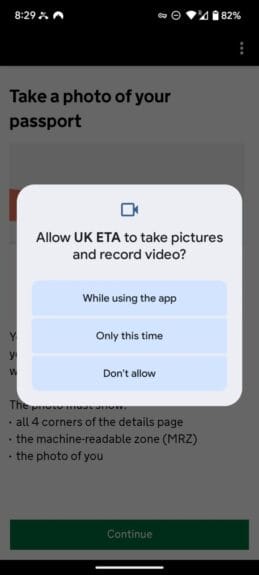
Since you have to take the photo directly in the app, you need to give the app access while you’re using it, only this time, or not at all (except you have to give access for it to work, obviously).
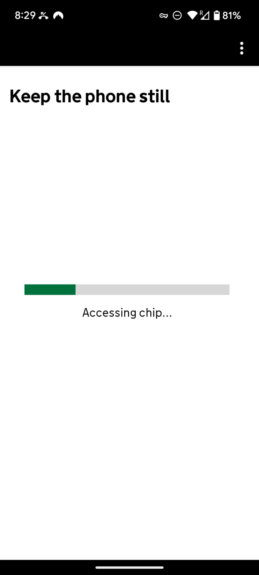
If your passport has a biometric chip, the app will ask you to verify the information (I imagine if you clicked no at the step where they ask, you won’t have this step to do).
For this, you need to close your passport, remove it from its case, and click “Continue”.
It will look like this during verification.
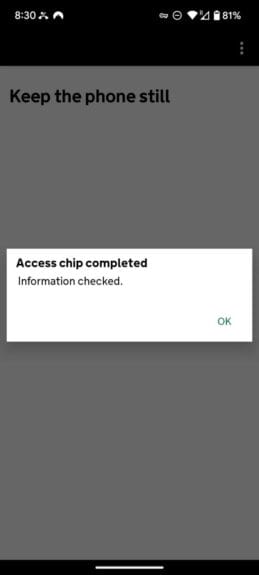
Once it’s finished, you’ll have a pop-up telling you so, and you need to click “OK”.
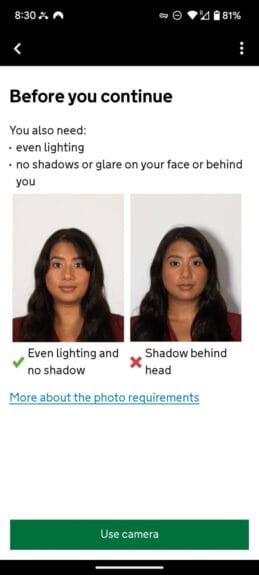
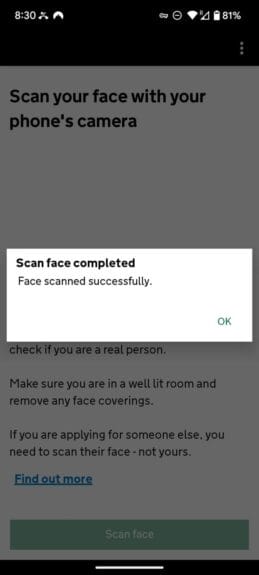
The next step is to “scan” your face with your phone’s camera. They want to verify that you’re a real person.
So, make sure you’re in a well-lit room and have your face clear before starting.
Obviously, if you’re applying for someone else, you need to “scan” their face and not yours.
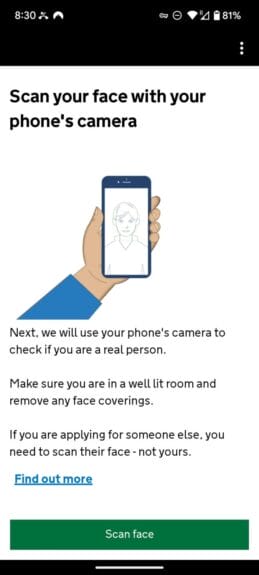
To make sure it’s done right, they remind you to keep your background clear and ideally position yourself in front of a white wall.
And to really make sure it’s done right, before being able to use your camera, there’s another reminder that the room must be well-lit and you should avoid having shadows behind your head.
Again, once it’s completed, you’ll get a pop-up and you need to click “OK”.
At this point, the app suddenly no longer allowed screenshots.

But it wasn’t anything complicated.
The next page asked you to enter your residential address.
I tried 3 unsuccessful attempts for my hometown:
- Trois-Rivières
- Trois Rivières
- TroisRivières
Usually, it’s the space or hyphen that’s the issue (French world problems). So finally, all I had left to try was the accent. Indeed, you just can’t have accents. Good luck to the residents of newly-renamed šxʷməθkʷəy̓əmasəm Street in Vancouver!
Very basic tip that’s for all topics, but one that might be useful considering how many people seem to struggle with simple things like finding how to redeem their points when the program website only has 5-6 options in the menu: you just need to go by deduction based on the existing choices, and just try all possible options, in the worst case scenario. It’s not very long.
The next page asked if you had a job, and if so, your job title (not your employer).
The next page asked if you had other nationalities. This is, unfortunately, not my case. But Kevin, Flytrippers’ other co-founder, has started his nationality diversification strategy and will talk more about this in his digital nomad content soon.
The next page asked if you had ever been convicted of a crime.
The last question page explicitly asked if you had ever been suspected of war crimes or terrorism. I think a positive answer here must significantly slow down the process!!!
And that’s it.
There’s a page that lists all your answers for you to validate.
Then you need to explicitly confirm that you answered honestly.
And finally, you can pay.
Being Canadian, the app forced me to pay in US dollars. The fee was therefore 22.4 USD, instead of 16 GBP.
I think there might be a way to change to pounds sterling, but I didn’t really want to look for just 1 CAD.
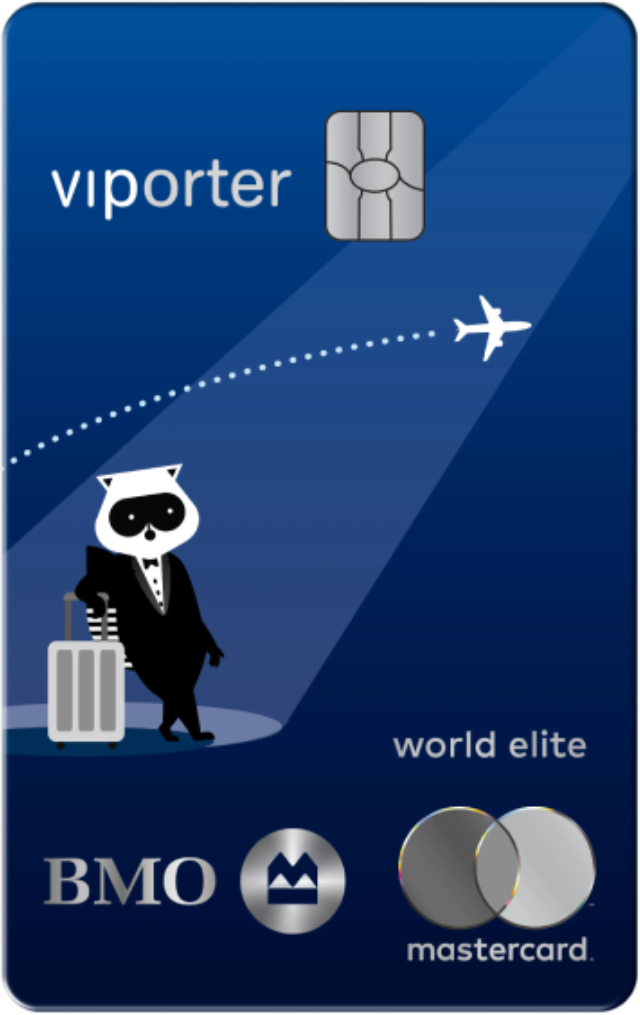
I’m a savvy traveler who understands that unlocking welcome bonuses is the key to traveling for less, so I used one of the cards I’m currently unlocking a bonus on.
In my case, it was the phenomenal launch offer (that’s still available) on the BMO VIPorter World Elite Mastercard.
It gives ≈ 8.8% back on my spending! So even by paying a 2.5% foreign transaction fee, the net earn of ≈ 6.3% gives me much more than using a card with no foreign transaction fee that only gives 1% back (1% minus 0% FX fee equals a net of 1%)… you need to know how to do math!
Step 5: Receiving the UK ETA
It’s pretty fast!
As you can see, there’s one minute between my email confirming that my application is being processed and the one approving my application.
But actually, it’s just that the time changed at that precise moment, because the 2 emails really came in instantly and at the same time as soon as I finished in the app. It didn’t even take a minute between the 2, I assure you.

And here’s what the email confirming that your application has been approved and that you can travel to the UK looks like (the “Your approval may have been automated” sentence confirms the obvious).
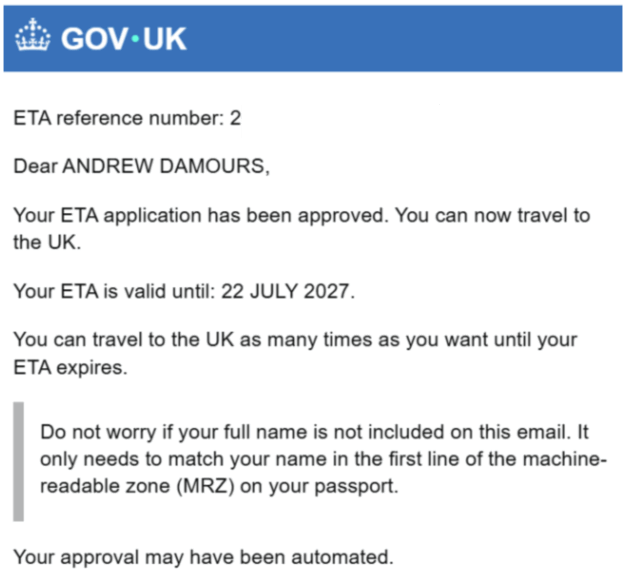
You do NOT need to print it or even show the email!
It’s 2026, so like your plane ticket reservations if you still check-in at the airport for some reason, everything is linked to your passport automatically, and you need NOTHING!!!
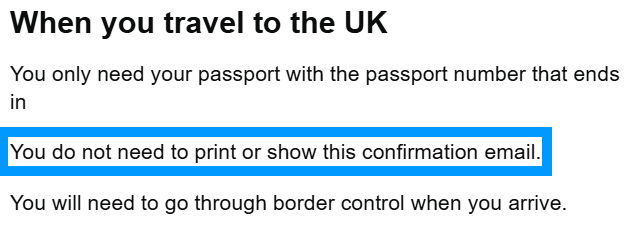
Seriously, stop printing your plane ticket reservations, please!
It’s entirely and completely useless. Not even 99.9999% useless: 100% useless. It’s also a simple way to reduce your environmental impact a bit, if that argument has any weight for you.
Learning how to travel for less
Join over 100,000 savvy Canadian travelers who already receive Flytrippers’ free newsletter so we can help you travel for less!
Summary
My experience applying for the UK Electronic Travel Authorization was very simple and efficient. It’s very similar to all the e-visas and ETAs I’ve had to do: by going through the official website and filling out the simple form, it works very well. In this case in particular, the response was also extremely fast.
What would you like to know about my experience with the UK travel authorization? Tell us in the comments below.
See the flight deals we spot: Cheap flights
Discover free travel with rewards: Travel rewards
Explore awesome destinations: Travel inspiration
Learn pro tricks: Travel tips
Featured image: London, England (photo credit: Benjamin Davies)
Original publication date: August 1, 2025


If we are just transferring through the UK, Cairo- UK- Canada and we won’t be leaving the airport, do we need the Visa???
Hi, it depends. If it’s at LHR with both flights on British Airways the same day, you shouldn’t need it. You definitely won’t if you travel like pro fliers, without checked bags. With checked bags, you should check on their website to make sure they can check it through to your final destination and that you don’t need to go through customs.